Table of Contents
Install Kali Linux Easily-VirtualBox Windows 10
Hey, guys, it’s hax here again! Today in this article I am going to teach you how to install kali Linux easily-VirtualBox windows 10. Basically to install kali Linux on Virtualbox it is really easy if you are new to this don’t worry I will show you all the steps. So without wasting a time let’s get a started
How to install kali Linux on VirtualBox windows 10?
Requirements for installing kali Linux on VirtualBox:
- Must have 4 to 8 gigabyte of ram.
The more ram you have it will be faster give it more if you have 16 or 32 gigabytes of ram.
- Must have a good number of processor 2-5 is recommended.
The more Core you give it will be easy to handle more program at once! i.e You can handle multiple programs at real time quicker! - Must have Official iso of kali Linux 2.0 or latest.(Download it from Official site kali.org)
As you guys know it’s open source it’s completely free. I highly recommend you guys to download it from official website because if you download from other site’s that may give you an error. - At least 20 GigaByte of the hard disk is needed.
You can give hard disk space size more than 20 gigabytes it depends on your uses! More hard disk you will get more storage to store files and document inside VirtualBox
If you guys have above requirement then your good to go, guys!
Let’s install kali Linux on VirtualBox easily now.
Alright, guys open your virtual box and now you want to click on new. After you click on new it will show you name and operating system box. Now you can give any name as you guys can see in image below :
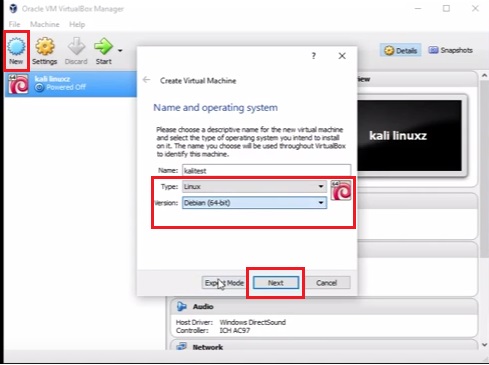
I gave the name as Kali Test and type as Linux and version as Debian because kali Linux is Debian based. After you set that thing just click on next.
Memory size:
You guys can select amount of memory as much you can but make sure it’s on the green label. As I have already told you guys more ram you have it will be faster. As you guy can see on the image below:
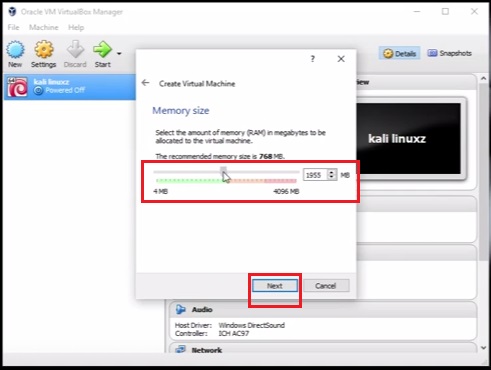
I gave mine as 2 gigabytes I have 4 gigabytes you can give more than this. after you set it up, click on Create.
Create Hard Drive:
Now check on create virtual hard drive and click on create. Then it will show you guys hard disk file type, just check on VDI(Virtual Disk image) and click on next as shown image below:
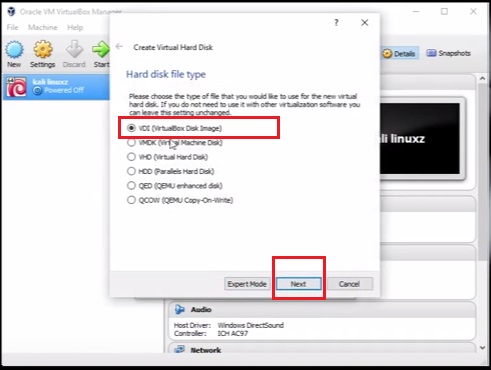
After you create virtual disk image it will ask you where you want to store. And how many gigabytes of hard disk you want to spend, take a look at image below:
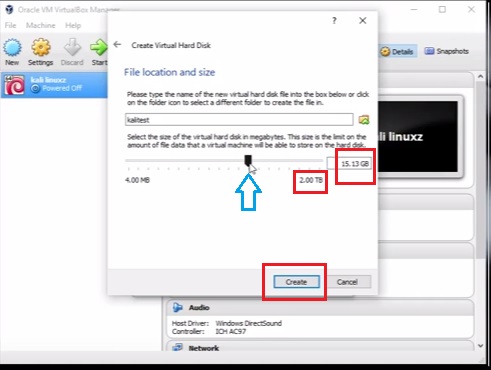
As you guys can see that I have created 15 gigabytes of hard disk. you can give more than that if you have terabytes if hard disk. it’s all up t you guys. So once you have set your harddisk level now just click on create and it will ready your hard disk. And now you’re ready for new kali machine.
Configuration and settings:
We are not finished yet now you want to change settings of your machine. Have a look image below:
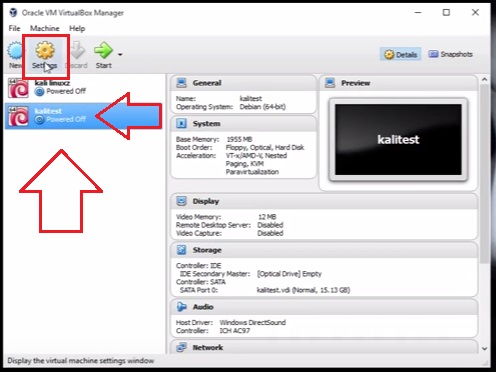
So guys click your kalitest then go to settings, Now under setting tab click on system and got to performance and then increase your processors as possible. As I have already to told you guys, the more Processor you have you can handle multiple programs at once. Take a look at image below :

As you guys can see that I have chosen 2 processor. Because I can;t choose more than that if I choose more it will give me an error now.
So the final thing in setting is that you want to go on storage tab as shown below on image:

Click on empty and then click on that little cd icon then choose virtual disk file. So it will open your file manager right now choose kali.iso from your Downloaded folder or where you have stored. After you choose ISO file now you can click on Ok button.
Let’s install now
After you have completed the setting up all now it’s time to install. Choose your kalitest and click on start as shown below on image:


So choose graphical installation as shown image above because graphical makes work easier. So now you should set all the things from setup, your language’s and choose keyboard as American English or your choice. And also give username and root Password. Once you complete those all steps you guys will be on partition disk, as shown figure below:
Now choose guided disk because of your own virtual box. I recommend doing this cause it’s automatically going to create hard disk and swap. So what is a swap, it is the virtual memory that acts like the ram. So choose guided and click on continue. As shown image below:


Choose finish partitioning and click continue.
Now system should be installing as you guys can see image below:

Click on yes every time if your been getting any message from here. it might take a long time to install so leave it as it is. and then once your finish or done, you want to close your virtual box then re-run it again and your good to start new hacking machine
as you guys can see image below:

Now you guys might be confused on login, Username is always root and password is Root password that you have setup earlier!
So that’s all guys hope you love reading this article and I think so you got good ideas now. If you need full review of this article then watch my video tutorial
Watch: Install Kali Linux Easily-Virtualbox Windows 10
Thank you guys so much for watching! love and support share this article if it was helpful for you.
